Spray Guns Conventional • Spray Guns HVLP • Glossary of Powder Terms • Air and Fluid Hoses • Pumps • Electrostatics • Spray Booths • Respirators
Paint Application
- Why is air control equipment necessary? Raw air, piped directly from an air source to a spray gun is of little use in spray finishing. Raw air contains small, but harmful quantities of water, oil, dirt and other contaminants that will alter the quality of the sprayed finish. Air filters filter out these contaminants before they get on your paint job. Air entering the filter is swirled to remove moisture that collects in the baffled quiet zone. Accumulated liquid is carried away through either a manual or automatic drain.
- What causes excessive pressure drop on the main line gauge of the filter/regulator?
- The compressor is too small to deliver the required air volume and pressure for all tools in use.
- The compressor is not functioning properly.
- There is leakage in the air line or fittings.
- Valves are partially opened.
- The air line, or piping system, is too small for he volume of air required.
- How do I prepare the paint? Always prepare paint in a clean, dust-free environment. Paint has a remarkable ability to pick up dirt. Dirty paint will not only clog your spray gun, but it will also ruin your paint job. Get in the habit of always pouring paint into the cup or tank through a paint strainer
- What are the advantages of using electrostatic equipment over conventional spray equipment? There are many advantages to using electrostatic spray equipment. The primary advantage is an increase in transfer efficiency. (45% – 90%) With the increase in transfer efficiency, clean-up costs go down, material usage drops and disposal cost decrease. Electrostatic methods also lower solvent emissions into the air since less coating material is needed to coat each part.
- I have flow, but how do I know if my fluid regulator is working?
If a fluid regulator fails it can no longer hold back fluid pressure. If the outlet pressure climbs up to equalize with the inlet pressure when you stop dispensing, the regulator has lost the ability to shutoff or fully regulate flow. If you have pressure limits set you will get a High Outlet Pressure alarm. If you have job volume limits set you will get a High Volume On Last Job alarm.
- My user’s manual says that I don’t have to clean the unit when you take breaks while painting. I want to know if it is okay to leave the sprayer loaded overnight? If I plan on spraying with the same paint the next day do I have to clean the unit, store it and then load it up again the next day? It is recommended that you flush the unit out every night to prevent paint from curing in the pump, which can be time consuming and costly to correct. Flush per the instruction and store the sprayer with mineral spirits in the hose and gun and mineral spirits or pump armor in the pump.
- I maintain my sprayers with my own mixture of spirits, solvents and mild cleaning solutions. Is there any material I should avoid using for this process? Our pumps are designed to withstand almost all solvents and cleaning solutions. In general, it is recommended that you complete your cleaning by flushing mineral spirits through the pump section, but other petroleum-based products and cleaning solutions will suffice if necessary. Also it is discouraged to blend solvent can be hazardous.
- How often should I tighten the packing nut on my airless sprayer? It’s a good practice to check the packing nut on a weekly basis and slightly tighten if it is necessary. Paint visible in the wet cup or on the rod surface is an indication that paint is starting to pass by the throat packing and the packing nut needs to be tightened. Depending on the style, put a flat-blade screwdriver or punch on the head of the packing nut and tap it lightly with a hammer. Tighten just enough to stop the paint leakage, DO NOT over-tighten. New or repacked pumps generally need retightening after the first several gallons. If the nut has been tightened completely and paint continues to leak past the seals, repack the pump.
- Do I have to flush my sprayer at the end of the day? It is recommended that you flush the unit out every night to prevent paint from curing in the pump, which can be time consuming and costly to correct. Flush per the instructions and store the sprayer with mineral spirits in the hose and gun and mineral spirits or Pump Armor in the pump.
Spray Guns Conventional
- I cannot trigger my spray gun. What causes this problem?
- Trigger safety is in the SAFETY position. Put trigger safety in SAFETY OFF position. Refer to your Instruction Manual for the operation of your particular spray gun’s safety.
- The gun housing may be blocked from pumping a highly viscous material with a lot of filler that has packed behind the gun needle and will not allow the gun needle to move. Disassemble and thoroughly clean the spray gun.
- What parts of the spray gun require lubrication? The fluid needle packing A, the air valve packing B and the trigger bearing screw C require daily lubrication with a non-silicone/non-petroleum gun lube. The fluid needle spring D should be coated lightly with petroleum jelly or a non-silicone grease (i.e.. lithium). Lubricate each of these points after every cleaning in a gun washer.
- What causes a top or bottom-heavy spray pattern?
- Horn holes plugged – clean holes with non-metallic point (i.e.. toothpick)
- Obstruction on top or bottom of fluid tip – clean
- Cap and/or tip seat dirty – clean
- What causes the spray pattern of my airless gun to feather? The problem you refer to as feathering is also known as tailing. This is due to low fluid pressure at the tip. To avoid feathering or tailing, increase the fluid spray pressure by increasing the pressure at the pressure control knob. If the pressure control knob is turned all the way up you may have to thin the paint or reduce the length of airless hose being used.
- How should the air cap be cleaned? Remove the air cap from the gun and immerse it in clean solvent. If necessary, use a bristle brush to clean dried paint. Blow it dry with compressed air. If the small holes become clogged, soak the cap in clean solvent. If reaming the holes is necessary, use a toothpick, a broom straw or some other soft implement. Cleaning holes with a wire, a nail or a similar object could permanently damage the cap by enlarging the jets, resulting in a defective spray pattern.
- How long should a gun last before needing to be rebuilt? What can I do to make it last longer? This depends on what material you’re spraying and how many gallons sprayed
per day. For example, with lacquers, guns don’t need rebuilding as often because lacquers don’t have solids in them. In contrast, the high solids in blockfillers are abrasive and require more frequent gun rebuilding.One way to increase gun life before repacking is to thoroughly clean your gun at the end of every day. Be sure to trigger the gun before removing the diffuser and when installing the diffuser. If you don’t, the diffuser will score around the ball on the new needle which can lead to premature wear. Your gun will develop a leak and this will cause spitting. - How long should a gun last before needing to be rebuilt? What can I do to make it last longer? This depends on what material you’re spraying and how many gallons sprayed per day. For example, with lacquers, guns don’t need rebuilding as often because lacquers don’t have solids in them. In contrast, the high solids in block fillers are abrasive and require more frequent gun rebuilding. One way to increase gun life before repacking is to thoroughly clean your gun at the end of every day. Be sure to trigger the gun before removing the diffuser and when installing the diffuser. If you don’t, the diffuser will score around the ball on the new needle which can lead to premature wear. The gun will develop a leak and this will cause spitting.
- Why did my airless gun just stop spraying? The tip may be clogged. Turn the black plastic arrow shaped handle to the unclog position (arrow facing rear of the gun). Aim the gun into a waste paint container. Squeeze the trigger for a second. Return arrow shaped handle to the spray position (arrow facing forward) to begin spraying. Always set the spray gun trigger safety when working with the spray tip.
- My gun is spitting a small paint stream of paint after releasing the trigger and additional material is splattering on the surface. What’s the cause and solution? The cause of the problem is that the needle is not seating properly in the seat. You will need to either purchase a kit for the gun needle and seat or you may only need to clean the needle and seat assembly. Residue or debris may cause the needle to move off to the side before seating.
Tip extensions, extension poles and tip filters can also cause spitting or a stream of fluid after the gun is released due to decompression of the paint trapped between the gun and the tip. Fluid pressure dissipating through the tip causes this spitting or paint stream. An automatic shut-off valve will prevent this problem.
- How do I know what size needle and nozzle is best for the job? Although every job may have slightly different requirements, for most materials it is best to choose a mid-size, or No. 3, needle and nozzle. If your paint is thicker than standard oil-based enamel, you may want to consider a larger size. Remember that there is no one tip that is perfect for all jobs. Needles and nozzles are quick and easy to change out. So try different sizes until you find what works best.
Spray Guns HVLP
- Can latex be sprayed with an HVLP Spray Gun? While most latex paints require some thinning for best results, the HVLP is a great tool for applications. Consult your paint supplier for recommended dilution amounts. Also, look for models with pressure-fed paint supplies because they work best with latex and other thick coatings.
- My HVLP gets very hot after running for awhile. Is this normal? It is perfectly normal. The turbines inside HVLP units run at a very high rpm, which generates a large amount of heat. HVLP units are designed to run effectively at high temperature levels. However, before using the unit, always refer to the owner’s manual for safety warnings.
- How does HVLP differ from conventional air spray? HVLP utilizes the volume of air available at the air cap rather than pressure to atomize. You will notice that all the orifices in an air cap are larger in an HVLP air cap in order to allow the volume to pass. HVLP air pressures are lowered internally in the spray gun air passages. Conventional air spray gun will normally have the same pressure at the air cap that was input to the spray gun.
- If HVLP means High Volume Low Pressure, why am I using High Pressure (40 to 80 psig) at the gun inlet? When using compressed air, the lower the pressure, the smaller the volume of air available. For example, air compressed to 40 psi contains 5 times the original amount of volume. Air compressed to 100 pounds contains 8 times the original volume. Obviously at 10 psi to the spray gun inlet, very little volume would be available for atomization.
- Is HVLP available for all fluid feed systems (suction, gravity & pressure)? Keep in mind that a suction feed gun depends on pressure at the fluid tip/air cap junction to create a negative pressure in relation to the cup atmospheric pressure. When using HVLP with 10 psi or less at the air cap, very little suction is created. Use only low viscosity materials with an HVLP suction feed gun
- Are other HVLP technologies available? Industrial HVLP guns are commonly called conversion HVLP guns. They use higher pressure air and convert it inside the spray gun. Another form of HVLP is the turbine unit. Turbines are more typically used in architectural or commercial applications. (Think of a shop vacuum in reverse)
- Is HVLP required in all industries? Not at this point in time. Even though some federal regulations restrict the use of conventional air spray guns, it is typically only required for “major emitters” as defined by the enforcing agency. Keep in mind that any local jurisdiction may have their own requirements (ie. Southern California
- Is it possible to exceed 10 psi at the air cap? HVLP air caps are typically rated for a maximum gun inlet pressure to achieve 10 psi at the air cap. For example if 50 psi inlet achieves 10 psi measured at the air cap, then an inlet pressure of 60 psi would exceed 10 psi at the air cap
- How can I be sure I do not exceed 10 psi at the air cap?
- Operator training
- Use an air cap test kit to measure the pressure at the air cap
- Do I need to use 10 psi at the air cap in order to atomize? Not necessarily. Use only enough air pressure (determines atomization quality) and fluid pressure (determines production capability) to do the job. Any pressure higher than that will increase over spray and lower gun efficiency
- Are all HVLP guns the same? Just like conventional guns, HVLP guns are available in different feed methods, production and atomization capabilities.
- Can I interchange air caps on HVLP guns? Yes and no. It depends on the manufacturer and gun mode
- What are some reasons HVLP might not work? Not enough air supplied. Restrictive quick disconnects and small inside diameter air hose are the common culprits. Additionally undersized compressors and low cfm regulators may cause problems. Another problem is not matching the equipment to the application. For example, trying to use a lower cfm air cap to spray high volumes of coatings
- Is operator technique different for HVLP? Spray gun to part distance typically is reduced to 6″-8″ for HVLP compared to 8″-10″ for conventional air spray guns
Glossary of Powder Terms
- Back Ionization: An excessive build up of charged powder particles which may limit further powder being deposited on the substrate. The electrical charge on the surface layer may be reversed, repelling additional powder. Bulk Density: Mass per unit of volume in powder form including the air trapped between particles.
- Cartridge Filter: A cylindrical filter unit used to separate oversprayed powder from air for recovery and reuse.
- Corona Charge: The process of inducing a static electric charge on powder particles by passing the powder through an electrostatic field generated by a high voltage device.
- Cure Schedule: The time/temperature relationship required to properly fuse a powder coating.
- Cyclone: A type of recovery unit using a centrifugal process to separate oversprayed powder particles from an air flow.
- Delivery: The process of moving the powder through the application equipment to the end product.
- Edge Coverage: A powder’s ability to flow over, build and adhere to sharp corners, angles and edges.
- Electrostatic Spray Technique: A deposition method of spraying and charging powder so that it is deposited on a grounded substrate. (See Corona charging and Tribo charging.)
- Faraday Cage Effect: A condition that may exist on a substrate due to its geometric configuration that may inhibit the electrostatic deposition of powder particles at a specific localized area.
- Film Formation: The forming of a continuous film by melting powder particles and fusing them together by the application of energy.
- Fluidizing: The process of suspending the powder in a continuous stream of air giving it “fluid” characteristics. Used to facilitate transfer of the powder to the application device.
- Fusion: The melting and flow of individual powder particles when heated to form a continuous film.
- Grounding: The electrical grounding of the item to be coated.
- Impact Fusion: The combining of powder particles to form a solid mass during the delivery and application process.
- Lower Explosive Limit (LEL): The lower point for a range of concentrations of organic particles suspended in air which can be ignited by a sufficient energy source.
- Micron/Mils: Common unit of measurement of coating thickness. 25.4µ (microns or micrometers) = 1 mil (one thousandth of an inch)
- Particle Size: Average diameter of an individual, irregular powder particle.
- Recovery: The process of removing non-deposited powder from the air prior to reclaiming it for reuse.
- Spray Booth: A specially designed enclosure in which powders are introduced, contained and recovered during the coating process.
- Surface Appearance: Generally refers to the smoothness and gloss of powder coating films and the presence and degree of surface defects.
- System Utilization or System Efficiency: The combined efficiencies of each component in the powder coating system resulting in total material usage compared to the amount of material entered into the system.
- Transfer Efficiency: The ratio of the powder deposited on the workpiece compared to the amount of powder sprayed during a fixed time period.
- Transfer Efficiency: The ratio of the powder deposited on the workpiece compared to the amount of powder sprayed during a fixed time period.
- Tribo Charging: Process of creating a static electrical charge on powder particles by creating friction between them and a nonconductive material.
- Virgin Powder: Powder that has not been previously sprayed as opposed to reclaimed powder.
- Wrap: A characteristic of electrostatic application for the powder to seek out and adhere to parts of the substrate not in direct line of sight of the delivery point.
Air and Fluid Hoses
- What is the life expectancy of my hose? HELP – Hose Expected Life Predictor. A guide to explain the factors used in choosing paint hose materials.
- Can I mount the electrostatic air hose to a reel mounted on a trolley cart which is grounded. Do I need a grounding wire at the gun to prevent paint from coming back to the painter holding the gun? Gun grounding to the hose reel is required. The grounding of the reel and the pump is more critical. You need to ensure a wire is run from the base of the reel to the cart and a separate wire ground be run from the cart to a structural ground point.
- How do I care for heated hoses? A heated hose is an electrical product and should be handled as such to prevent damage. Some best practices to reduce hose damage include:
DO’S
- Use the correct amount of hose for the system. Too much hose can cause the hose to drag on the floor, be stepped on, or otherwise damaged.
- Use 470 to 550 lbs. in force to attach hoses to applicators, pumps or accessories. Over tightening can cause the wires to crush, shorting out the hose.
- Use hose support springs and straps to prevent the hose cores from kinking.
- Allow the hose to heat up, once it has been filled with material, before trying to flex it.
DON’TS
- Do not pull or stretch the hose. This can lead to wires becoming loose and shorting out the hose.
- Do not twist or torque the hose as this can cause the heating wires to cross, creating a hot spot and burning out the hose.
- Do not clamp or use tie wraps to support hoses. These can cause a bend point in the hose which can cause hose core damage when the hose is at temperature.
- Do no cover or tape the hose assembly. The hose is designed to release excess heat. Insulating the hose by wrapping it can cause the hose to over heat or short out.
- Do not over-bend the hose as this can cause a stress point on the hose, leading to hose core damage.
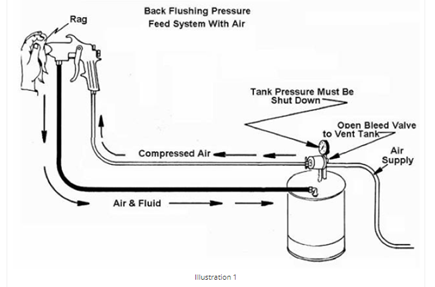
How do I back flush the fluid hose to my pressure pot and why should I do this? The cost of many modern coatings is in the area of $100 per gallon or more. If one can recover the coating from the fluid hose before flushing the hose with solvent, the amount of money saved can be considerable over a period of time. A 25 foot length of 5/16” fluid hose contains approximately 12.7 fluid ounces. Flushing the hose 10 times would waste (or save) about 1 gallon of coating.
Safety warning: DO NOT use the following method to flush out high pressure equipment. This method is designed to back flush operations using pressure pots.
Typical recommendations for back flushing a pressure pot are to hold a rag tightly over the air cap with the fluid pressure off and the air pressure on. (See illustration 1)
USE FAQS 1 – AIR HOSE DRAWING.PNG
Note that the tank pressure has been relieved and the tank is open to atmosphere either by opening the tank vent or leaving the tank lid ajar.
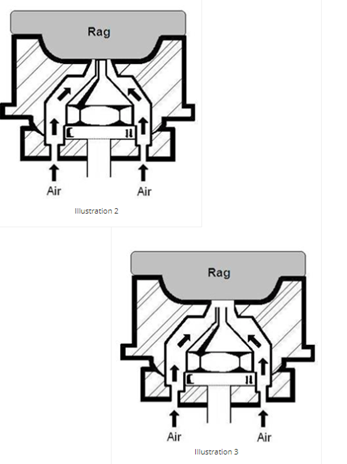
Holding a rag against the air cap with air cap in “operating” position results in no fluid being back flushed (see illustration 2). The rag not only blocks the center annular hole of the air cap, it blocks the fluid tip opening preventing the air from entering the fluid tip.
Loosen the air cap retaining ring approximately two turns before applying the air pressure. (See illustration 3). This position raises the air cap above the fluid tip allowing the air to flow into the fluid tip, pushing the coating back to the pressure pot.
USE FAQS1 – AIR HOSE DRAWING.PNG
Back flushing your fluid lines results in lower coating costs, lower solvent costs and lower disposal costs.
Pumps
- I have a Graco pump, but it doesn’t seem to be keeping up, is there a way to troubleshoot/test it? Yes, close your valve or gun and the pump should stop completely, do this on both the up and down stroke. If the pump doesn’t stall on eh up stroke, this means you have a fluid leak by the upper ball and seat, or through the gasket at the top of the cylinder. If the pump doesn’t stall on the down stroke, this means you have a fluid leak by the bottom or intake ball and seat. Balls are usually included in the repair kits, if your pump still leaks on one or both strokes after putting in a kit, then you need to look at replacing the seats.
- How do I get the pump to prime, especially first thing in the morning after it’s been sitting all night? The most common cause of this situation is an intake ball that is not seated properly. Tap on the pump lower with a rubber mallet to dislodge the ball so it rests tightly on its seat. Other possible causes may be a worn inlet hose o-ring (which you should replace). You may need to tighten a loose suction hose fitting or clogged inlet strainer. To alleviate the problem, flush your sprayer with mineral spirits at the end of the day.
- How do you solve the problem of fracturing diaphragm pumps while they are being used as a feed supply pump? It is not recommended to use a low-pressure pump to feed a high-pressure pump without the addition of a high pressure check valve installed directly before the intake of the high-pressure pump. The reason for the high-pressure check valve is prevent any high-pressure material from backing up into the low-pressure supply hose and pump. One of the reasons this happens is when the intake valve or lower ball and seat on the main pump do not seat properly on the down stroke. This is the main reason for installing the check valve prior to the high-pressure pump inlet
- I have a new diaphragm pump and it leaks almost immediately after installation. This leak usually occurs around the diaphragms, or at the manifolds. What can be done? Polypropylene is a very soft almost waxy material that when it is compressed, instead of pushing back against the compression, like a Buna material, it moves out of the way or “cold flows.” Pumps that have Teflon parts (o-rings, diaphragms, etc.) also “cold flow”. So, when a pump is first assembled the material will cold flow resulting in the original torque actually relaxing causing leakage. This is why all diaphragm pumps are shipped with a tag attached recommending all fasteners be re-torqued prior to installation. That is not to say that all pumps if not re-torqued will leak, but the likelihood would be greater. It is important to torque the fasteners before leakage occurs as any amount of tightening may not be able to overcome the leak path that has been established. Also, if the manifolds are being removed and reoriented, I would recommend the o-rings be replaced.
- There is oil leaking out of a small hole underneath the air motor of my pump. Can this hole be plugged? No! If oil is coming out of the small hole underneath the air motor of your pump, the throat packing should be replaced. It may also be advised to ensure there are no imperfections on the rod.
- What is the air consumption of a diaphragm pump in cubic feet per minute? As a general rule PUMP RATIO X FLOW RATE (GPM) @ 100 PSI = CFM. All diaphragm pumps are a 1:1 ratio, therefore the flow rate in GPM will equal the cubic feet per minute.
- The pump on my lube truck seems to operate fine, but material volume has dropped. What might be the problem? If the pump is being used outdoors and the temperature has dropped, the material has thickened resulting in lower pump performance. Pump performance can be improved by . . .
- Using a larger diameter hose.
- Using a shorter hose length.
Warming the grease to room temperature (with a barrel heater or heater blanket.
- Should a lubricator be used on a diaphragm pump? Lubricators are not recommended on diaphragm pumps. An air filter is recommended to maintain good clean dry air.
- What causes premature throat seal leakage and is there a way to prevent it? Premature throat seal leakage and packing wear can occur when Throat Seal Liquid (TSL) is not used in the pump wet cup. A thin film of paint can accumulate on the pump displacement rod while the pump is running. When the pump is not being used and the displacement rod is exposed to air the film of paint on the rod can dry and harden. When paint has dried on the displacement rod and the pump is run, the throat packings are damaged and will begin to leak.
To prevent premature throat packing wear, fill the pump wet cup 1/3 full with Graco Throat Seal Liquid (TSL). This will keep a wet film on the displacement rod and prevent paint from drying on the displacement rod. Keeping the displacement rod wet with a film of TSL will prevent paint from drying on the rod extending the life of the throat seal packings.
Electrostatics
- What is the advantage and disadvantage of electrostatic/conventional airless and air spray? The finish required between an airless gun and an Electrostatic Air Spray gun are significant. Even ambient conditions can make a large difference. In general, the electrostatics works best on small particles such as are common with an Air Spray product. Conventional airless produces larger particles and a high directional velocity and usually have a much higher fluid delivery than does Electrostatic Air Spray. In basics, the Electrostatics Air Spray offers more gain in efficiency and a much higher finish quality than airless. If the product is currently sprayed airless and a higher efficiency is needed, the best route is to go to an Electrostatic Air Assisted Airless technology. The operator can use the same pump/system as his old Airless and all that is needed is a small air compressor for the gun.
- Does electrostatics work only when spraying metal pieces? No, nearly any piece can be sprayed electrostatically. If the electrostatically charge paint “sees” a conductive grounded surface it will be attracted to it. A nonconductive piece can be sprayed electrostatically by either putting it between the applicator and a conductive grounded surface or spraying the piece conventionally with a conductive primer.
- Why should I choose an electrostatic spray gun over a conventional spray gun? Although an electrostatic gun may cost more, it has many advantages over a conventional spray gun. An electrostatic gun has a very high transfer efficiency (40-98%) which results in a lower paint cost, less VOCs, less cleanup and faster production.
- How does a rotary atomizer work and where should I consider using one? If you’re looking for high fluid delivery (up to 1500 cc/min), an even finish, and automation, you may want to consider a rotary atomizer. A rotary atomizer works by spinning a bell or disk at high speed (up to 40,000 RPM). This high speed, along with the serrated edge of the bell or disk, provides an excellent means for atomization.
- Why should I need to purchase equipment geared specifically for a waterborne paint? Waterborne paints are highly conductive. As a result, the paint supply and fluid lines must be isolated. Power supplies must also be designed to accommodate for the inherit high current draw of waterborne paints. Spraying waterborne paint through a solvent-borne system is dangerous and may result in equipment damage.
- Can electrostatics be used to paint something other than metal? If so, will you get the same benefits as spraying metal electrostatically? Almost any product can be finished electrostatically. Some may require pretreatment with chemical sensitizers to produce a conductive surface. With some products, a metal object may be placed behind the part to create a ground image for attraction. Many black rubber items have enough carbon content to be sprayable. Others, such as wood parts, sometimes have enough moisture to produce a ground sufficient to spray electrostatically. The many advantages and savings associated with electrostatic spraying justify the application of a pretreatment or preparation product. Material, maintenance, labor and filter savings alone help justify an electrostatic application, not to mention increased production.
- Will painting electrostatically provide better adhesion? Painting electrostatically will give better transfer efficiency (more paint on the part) but not better adhesion. Adhesion depends on the condition of the substrate and the properties of the paint. Painting, in general, electrostatic or conventional, requires the same type of properly prepped surface before applying paint. Proper preparation is an important key to a good paint job.
- Can waterborne paints be sprayed electrostatically? Waterborne paints are the most conductive paints made. This makes them ideal for electrostatic applications. However, when spraying waterborne paint electrostatically, the charge will be carried back to the fluid-supply system. Therefore, spraying waterborne paint electrostatically requires isolating the paint-supply system from contact with people. Special hardware is required, such as an isolation stand and cage or voltage-blocking system. Various types of isolation devices are available, depending on the application and manufacturer.
- What needs to be grounded when using electrostatic guns? All of the equipment, personnel and target parts in the spray booth area must be grounded. Any ungrounded object, or person, in the spray area can become electrically charged. Improper grounding can result in static sparking which can cause fire or electric shock.
- What is the best way to check the voltage of an electrostatic gun? There are several ways to check the voltage of an electrostatic gun. The best way to check the voltage is to have a PRO Electrostatic test equipment kit. Included in this kit are the high voltage probe and meter, the PRO Cartridge and Alternator test fixture, and the alignment sleeve for use with all of the Pro Guns and power supplies. With this kit, you are assured of accurate voltage measurements of both the electrostatic gun and power supply.
- What is the difference between a cascade and a classic type power supply? A cascade type power supply sends out a low voltage that is then stepped up at the transformer on the gun. A classic type immediately sends out the required high voltage.
Spray Booths
- How do I improve booth energy efficiency?
- Start by upgrading the fan motor. Replace it with one meeting the newer, premium energy efficient electric motor standards. These motors are constructed using heavier wire, better grades of steel, thinner and longer laminations and better bearings. The efficiency increase is particularly significant in the lower horsepower range. For example, a typical filter booth is equipped with a 5 hp, 3-phase motor. The standard efficiency motor supplied with the booth has a power conversion efficiency of 84%; while its premium efficiency cousin will have a power conversion efficiency of 89.6%. According to U.S. Department of Energy (DOE) the cost of the electrical power consumed by an industrial motor over its useful life is 30 times its initial purchase price. The cost premium for an energy efficient motor is frequently recovered in less than a year
- Resist the temptation to oversize the fan motor. Over-sizing the motor adds cost in two ways. The initial purchase cost will be higher and the actual operating energy efficiency will be lower, needlessly inflating its power consumption. Consult NEMA (the National Association of Electrical Manufacturers) or the motor manufacturer’s guidelines when sizing a replacement motor for your booth. Usual practice is to operate motors in their most efficient range – 75% to 100% of their full load rating.
- Replace inefficient, power consuming, mechanical control devices, such as variable speed pulleys, dampers and bypass vents with a variable frequency drive (VFD) designed to drive your new energy efficiency motor. The DOE estimates industrial motor energy consumption could be reduced by up to 18% if companies replaced their motors with high efficiency ones and powered them with energy efficient electronic variable frequency drives.
- Consider upgrading the spray booth to include energy efficient, closed-loop constant airflow control technology. This new control package includes both an energy efficient motor and a variable frequency drive. The closed-loop system automatically maintains the preset exhaust airflow as your booth’s arresting filters load with overspray by monitoring the actual exhaust airflow and adjusting the motor rotational speed to maintain it at the preset level. The system consumes only as much power as is needed to maintain the preset exhaust airflow at any given moment in time. An added benefit of upgrading the booth airflow control system is gaining a stable environment for the spray finishing operation the booth houses. Practitioners of six sigma and other popular continuous improvement disciplines find constant booth airflow enables them to fine tune the entire spray application operation, further reducing the line’s operating cost.
- What codes will my booth be required to meet? Most municipalities/cities require that paint booths, including installations, meet National Fire Protection Association (NFPA) Chapter 33, OSHA 1910, NEC, and more recently IFC. These are national and international code guidelines; however, local authority prevails in most cases and will have the final say on code requirements.
- What types of requirements or permits would we need to put in a vented paint booth? ou might not need a permit from your state air pollution control agency if you are using “very little” paint, but the fire department will probably want you to vent the booth. Your insurance company will also definitely want you to vent it to prevent a fire or, worse, an explosion.
You will need to read your state’s air pollution permit rules to determine what the “de minimum1” amount of paint is below which a permit is not required. The size of the booth and the design is also a factor.
It’s possible retrofitting your booth with a fan that will pull at least 100 ft./min. of air could possibly help. As another suggestion, download bulletin NFPA-33 from the National Fire Protection Association website (nfpa.org/catalog/product.asp?catalog%5Fname=NFPA+Catalog&pid=3395&query=nFPA+33&link%5Ftype=search&src=nfpa).
- Cleaning procedures for polycabonate booth walls? Wash the booth walls with a mild soap or detergent (such as Joy Dishwashing Liquid) and lukewarm water, using a clean sponge or soft cloth. DO NOT SCRUB OR USE BRUSHES!!!
- Rinse well with clear water.
- Dry thoroughly with a chamois or cellulose sponge to prevent water spots
- Fresh paint splashes, grease and smeared glazing compounds can be removed easily before drying by rubbing lightly with a grade of VM&P naphtha or isopropyl alcohol. This should be followed by warm wash using a mild detergent and ending with a thorough rinsing with clean water.
The following are the only solutions recommended for use by the manufacturer of the polycarbonate material:
Compatible Cleaning Agents
- Windex with Ammonia D
- Clean
- Top Job
- Fantastik
- Joy
- Palmolive
- Formula 409
Organic Solvents
- Naphtha (VM&P Grade)*
- Kerosene* (DO NOT USE GASOLINE)
* Following immediately with a thorough soap and water cleaning.
Alcohols
- Methanol
- Isopropyl
Scratch Repair
If scratching should occure, minor abrasions can be removed or minimized by using a mild automobile polish. Examples of such polishes include (1) Johnson Paste Wax, (2) Mirror Glaze Plastic Polish (M.G.M10-Mirror Bright Polish co., Pasadena, CA), (3) Plexus (B.T.I. Chemical, Aguora, CA), and Novus Plastic Polish #1 and #2 (Novus Inc., Minneapolis, MN).
NOTE: A test should be made on a sample area with the selected product before all over use
DO NOT
- Use abrasive or highly akaline products
- Scrape walls with squeeges, razor blades or other sharp instruments
- Use Bensene gasoline, acetone or carbon tetrachloride
- Clean while booth temperature is elevated or when a high percentage of humidity exists
What is the typical annual schedule for dry filter spray booth maintenance? Preventative maintenance on a spray booth will help reduce the likelihood of fires and explosions.
- Regular maintenance of the booth system and maintaining its systems in good order contribute to the fire prevention effort by removing flammable accumulations and dust, as well as make a clean finish possible.
- Use of the booth requires a regular schedule of filter replacement. Codes require that filters be inspected after each period of use and that clogged filters be discarded and replaced immediately, another practice that contributes to fire prevention as well as a clean finish.
Daily
- Clean/wipe down air hoses
Weekly
- Vacuum interior of spray booth
- Wipe interior of spray booth walls
Quarterly
- Clean light fixture glass
- Vacuum pit and tunnel
- Clean and remove overspray from floor
- Check motor belts
- Pressure wash floor grates
- Inspect door seals (replace when required)
- Check and tighten all electrical connections
- Service airflow switches
Semi-Annually
- Lubricate door hinges
- Pressure wash spray booths
- Lubricate blower shaft bearings
- Calibrate booth pressure balancing gauge
- Fire suppression system
Annually
- Clean light tubes
- Check light fixture glass seals
- Clean inside of all light fixtures and glass
- Clean exhaust stack, dampers and stack head
- Clean main exhaust blower/fan
- Burner system tune-up (start-up procedure)
- Clean upper plenum
- Lubricate motors
As Required
- Door seal/gasket replacement
- Door hinge brass bushing replacement
Replace light tubes and ballasts
Do I need an Air Make Up unit with my spray booth? The proper air flowing into a spray booth meets the following conditions:
The air volume in the plant (cubic feet) should be 20 times the air exhausted in one minute by the spray booth. Put another way, you want no more than three plant air changes in one hour. The following gives an example of using plant air. To calculate booth exhaust air multiply booth face square feet by velocity required.
|
|
Air Exhausted @100 FPM |
|
1 Spray Booth 8′ x 12′ |
9,600 |
|
2 Spray Booths 8′ x 10′ |
16,000 |
|
2 Spray Booths 8′ x 8′ |
12,800 |
|
Total Air Exhausted |
38,400 Cubic Feet |
Multiplying the air exhausted by 20 yields a plant volume requirement of 768,000 cubit feed, or a building size of 200′ x 256′ with 15′ ceilings.
Respirators
- What is the sterilization process used? Gamma-irradiation is a highly effective sterilization process used to eliminate microorganism counts from an item. Gamma rays are very penetrating and are commonly used for sterilization of disposable medical equipment.
- What does 10(-6)Sterility Assurance Level mean? This means that the possibility of organisms living on a Bullard hood or facepiece is one-in-a- million. That’s a significant number when you consider the odds of being struck by lighting is 576,000 to 1; the odds of getting a hole in one is 5,000 to 1; and the odds of an organism on a Bullard sterile respirator is one-in-a-million
- Who validates the sterilization of the product? The CC20 and RT products are all FDA-validated. This validation occurs when the gamma-irradiated product reaches a level of sterility measurement that the FDA considers acceptable.
- What is the difference between sterilized and sterilization? Sterilized means the item has been treated but no certificate has been issued. Sterilization is a pure process that effectively eliminates viable microorganisms from an item. A certificate of sterility is issued when this process meets the Sterility Assurance Level.
- Does the customer have to assemble the respiratory system? No, the sterile respirators are pre-assembled to ensure sterility of the system. Each assembly includes a hood or facepiece, breathing tube and if required, a clamp.
- What documentation is provided to prove the product is sterile? The CC20 and RT sterile products ship with a Certificate of Sterility.
